Multiband Saturator
What Multiband Saturator is and how to get the most out of it.
Product Version: 1.3 · Last Updated: 1st April 2026
Concept
This device started out as an accompaniment to Squeeze but became much more. The basic premise was to use the same crossover filters but implement superior antialiasing to any saturation or distortion that’s native to Live, while also making use of the power of mid/side saturation.
The final result includes many enhancements that encompass a myriad of mixing techniques that I consistently employ for more exciting and balanced mixes. The interface is packed tightly on purpose, as to not consume excessive time or thought, allowing you to focus on the task at hand, making great music.
I have written an article about the early development of Multiband Saturator for Circuit Punks magazine, which you can read here: https://fixationstudios.com.au/circuit-punk-gmaudio/
As far as I’m aware, there is nothing with the same feature set, especially that enables you to make a few swift changes to, often drastically, improve a signal, group or mix. Sound design, mixing or mastering, Multiband Saturator has a place, and it should get you there, fast! Where can you find dynamic, transformer-like, multiband, effectively alias free, mid/side, parallel saturation? Right here, that’s where.
To keep it simple, you can think of Multiband Saturator as a tool to reshape existing frequency content quickly and effectively. Whether that be to add additional frequency content via Drive or adjusting balance via band Gain. This should at least help you get started using the device, but you will soon realise that this device can help you nudge any instrument precisely into place, or breathe life into a dull mix, unlike any other tool.
How to use it
Multiband Saturator can be used on any signal, but a good place to start is a group of instruments, such as percussion or synths, or the master.
The RMS metering, or Bar Display, shows Mid information as the narrower bar and Side information as the wider bar, each of which has its own band. It is calibrated to a 4dB spectral tilt (earlier versions were calibrated to Pink Noise) and shows a faint grey line which represents ‘ideal’ balance, referred to as the Balance Line. Use the Channel Selector to switch between Mid or Side channel parameters, this also highlights the relevant channel in the Bar Display.
It should be noted that the Balance Line is based on the Mid Channel only, not the Side Channel or a mix thereof, as no ‘ideal’ exists in these scenarios.
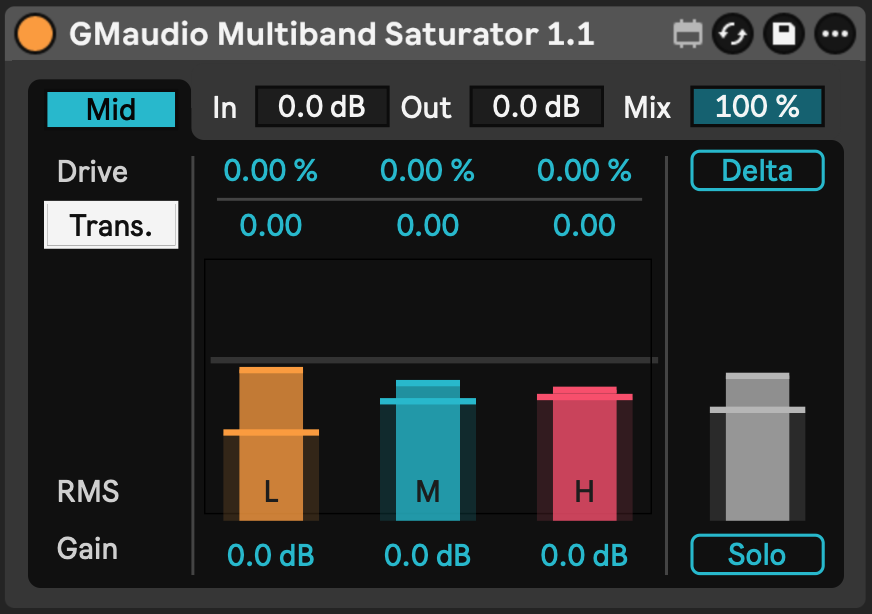
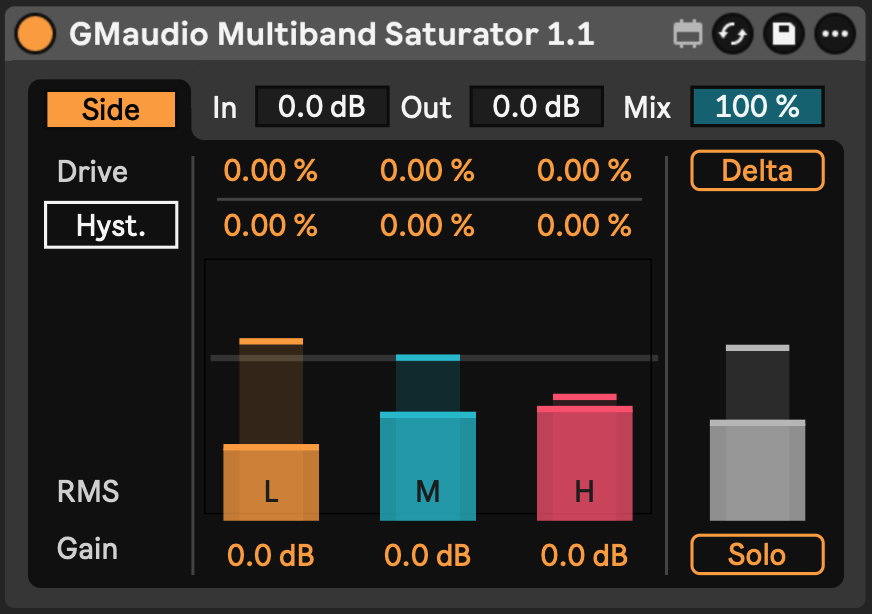
You could use either Drive to synthesize additional harmonic content for a band that is lacking energy based on this balance guide, or Drive and Gain to manage existing frequency content to your desire. One of the major benefits of this device is that the Drive parameter is volume compensated, just turn it up and new frequency content is created, no clumsy controls or guess work. Gain in this case, then works like a very broad shelving EQ, ideal for making fine adjustments.
You can then take things further using the Colour Selector to switch between Hysteresis, Transient Focus or Tone Shaping parameters for the selected Channel. Applying Hysteresis will change the balance of harmonics and create additional frequency content. Transient Focus will dynamically shift the frequency content, or saturation’s compression-like effects, towards transients or sustain. Tone Shaping provides control over pre/post tilt filters per band, allowing further harmonic adjustment.
There are exhaustive preview/solo options per channel/band to hear exactly what the device is doing, as well as considerable workflow improvements. See the Keyboard Modifiers section below for more details.
A great way to use the device is to be a little ‘heavy handed’ and then dial back the Dry/Wet to around 50%. This device was designed to avoid any phase interactions in order to make this possible. This prevents overuse, and buries any remaining aliasing further into the noise floor.
Latency
GMaudio Multiband Saturator requires 13 samples latency.
Controls
Channel Selector - Selects either the Mid or Side channel, displaying the relevant parameters and information.
Solo (Channel Selection) - If enabled, will solo the selected channel (Mid/Side), bypassing the Output Trim & Dry/Wet Mix.
Delta (Channel Selection) - Listen to the difference between the incoming and saturated signal before any Gain changes, for the selected channel (Mid/Side).
Colour Selector - Switches between Hysteresis, Transient Focus & Tone Shaping, displaying the relevant parameters.
(Mid) Low / Mid / High Drive - Controls the amount of saturation for the Low / Mid / High band in the Mid channel while maintaining a consistent level.
(Side) Low / Mid / High Drive - Controls the amount of saturation for the Low / Mid / High band in the Side channel while maintaining a consistent level.
(Mid) Low / Mid / High Hysteresis - Controls the amount of Hysteresis for the Low / Mid / High band in the Mid channel, resulting in more even order harmonics.
(Side) Low / Mid / High Hysteresis - Controls the amount of Hysteresis for the Low / Mid / High band in the Side channel, resulting in more even order harmonics.
Hysteresis is a phenomena that occurs in magnetic components, such as inductors, transformers or tape, where previous inputs affect the current output. In Multiband Saturator this creates a program-dependent memory-effect which biases the saturation based on previous history, much like a transformer. Higher values can mimic the behaviour of cheaper transformers, which saturate or break up at much lower levels.
(Mid) Low / Mid / High Transient Focus - Focuses the saturation on the sustain or transient dynamics for the Low / Mid / High band in the Mid channel, resulting in more compression of transients and clarity on sustain, or vice versa.
(Side) Low / Mid / High Transient Focus - Focuses the saturation on the sustain or transient dynamics for the Low / Mid / High band in the Side channel, resulting in more compression of transients and clarity on sustain, or vice versa.
A Transient can be described as the onset of a sound, which commonly occurs with percussive material. This is usually detected by comparing the average energy with the peak energy, if there is excess peak energy, then the potential for a transient is high. The transient detection algorithm in Multiband Saturator is my fourth iteration and incredibly effective, but it’s not perfect, which is to be expected from any realtime estimation.
(Mid) Low / Mid / High Tone Shaping - Applies a pre/post tilt filter to the Low / Mid / High band in the Mid channel. Positive values bias the saturation towards higher frequencies, reducing its effect on low frequencies, with negative values providing the opposite.
(Side) Low / Mid / High Tone Shaping - Applies a pre/post tilt filter to the Low / Mid / High band in the Mid channel. Positive values bias the saturation towards higher frequencies, reducing its effect on low frequencies, with negative values providing the opposite.
The tilt filter used is a 6dB/oct virtual analog high/low shelving filter, centred at the halfway point between each band, effectively giving us 6 bands of saturation per channel. This filter is applied before and after the saturation, which inherently has an effect on ‘Hysteresis’, multiplying the sonic potential when used in combination. Keep in mind that using this on the high bands is very program dependent and may appear to have less of an effect than with other bands.
(Mid) Low / Mid / High Gain - Adjusts the amplitude for the Low / Mid / High band in the Mid channel.
(Side) Low / Mid / High Gain - Adjusts the amplitude for the Low / Mid / High band in the Side channel.
Input Trim - Adjusts the input gain, changing the level at which saturation takes place providing finer adjustment of saturation amounts.
Output Trim - Adjusts the output level to compensate for gain changes, allowing you to better balance the amplitude before mixing with the unprocessed signal, if needed.
Dry/Wet Mix - Controls the balance between the unprocessed and processed signal.
Key Modifier Behaviours
Holding Alt/Opt (PC/Mac) while clicking on a Band in the Bar Display will Solo that band within the currently selected Channel. Holding Ctrl/Cmd (PC/Mac) and clicking in the same way, will preview the difference between the input and saturated output (or Delta) for that particular band, so you can hear what has changed. Both operations will bypass Output Trim and Dry/Wet Mix in order to be effective.
Holding Ctrl/Cmd (PC/Mac) while hovering over a Transient Focus parameter will preview the dynamic separation for that band within that channel, so you can hear how the transient or sustain is being split.
Holding Alt/Opt (PC/Mac) while adjusting a Drive, Hysteresis, Transient Focus, Tone Shaping or Gain parameter will apply relative adjustment to all 3 bands of that channel (Mid/Side).
Holding Ctrl/Cmd (PC/Mac) while adjusting a Gain parameter will apply compensation to the remaining bands in the channel, ensuring the channel remains approximately LUFS matched.
Holding Ctrl/Cmd (PC/Mac) while adjusting Input or Output Trim will apply the inverted amount to the other parameter, useful for global headroom adjustments.
GMaudio Multiband Saturator is Push Ready with all relevant controls being accessible via an Ableton Push and is Push 3 Standalone Compatible as of version 1.1.
Tips
Width
If you want a really wide instrument, you can adjust Drive and Gain in such a way that the Side channel Bands are level with the Mid channel in the Bar Display, especially in the higher bands. This is often a good compromise and avoids over zealous width enhancement that I commonly see in mixes.
Excessive energy in the Side channel’s Low Band can result in a lack of focus, especially for club orientated music. It is common to reduce this for bass or lead instruments, or in mastering, in order to ensure a tight and focused low end. This works especially well on modulated and spatial signals such as reverbs, or processing chains including flangers and phasors.
If the Side channel information exceeds the Mid channel for a particular Band, this indicates poor phase correlation. This can be mitigated by reducing that band’s Gain in the Side channel, or increasing Gain in the Mid Channel. This often translates to improved clarity and mono compatibility.
Transients
At low Drive values (<50%), applying negative Transient Focus will result in a very subtle transient emphasis. This occurs when there isn’t quite enough Drive to audibly saturate the signal, but enough so that focusing the saturation on the sustain compresses it slightly, leading to a subtle transient enhancement. This works well on the Mid Channel’s Mid Band.
At moderate Drive values (between 50% & 100%), applying positive Transient Focus will result in extra bite, giving the perception of louder transients. In this case it acts similar to a clipper, in that the transients are compressed, new frequency content is added, and less saturation is being applied to the rest of the signal. This works especially well on the Mid Channel’s Low Band.
Transient Focus works best on the Mid Channel because that is often where transients reside. When it comes to the High band, you can think of Transient Focus as a way to compress (positive values) or expand (negative values) the transients slightly.
Other Tips
I often find myself applying saturation mostly to the Mid band with some Hysteresis for synth groups (in order to help emphasise musicality through more even harmonics), and mostly to Low and High bands with some Transient Focus for percussive groups.
Using Tone Shaping, Transient Focus & Hysteresis together on the Mid channel’s Low band can be an absolute weapon for juicy, tight bass, providing just enough degrees of freedom to fit almost any composition.
Always apply processing when listening to the whole mix and focus your attention on how an instrument sits within the mix. Notice how your perception is pulled towards different instruments as you adjust parameters. Multiband Saturator is excellent for nudging a sound into a particular place when you are not quite sure what tool to use, because it is so efficient in its flexibility.
If you find an interesting situation or circumstance where Multiband Saturator excels, make sure you tag me on social media or send me a DM. Here are my socials https://lnk.bio/RobertK